How to Execute a Large-Scale Data Ingestion System Migration
Introduction
Migrating a data ingestion system that handles petabytes of data daily is a monumental task. At Meta, our engineering teams successfully transitioned from a legacy system to a new architecture, enhancing reliability at scale. This guide breaks down the strategies and steps we used, so you can apply them to your own migration. Whether you're managing thousands of jobs or just starting, these principles will help ensure data integrity, minimize downtime, and maintain performance throughout the process.

What You Need
- A legacy data ingestion system (e.g., customer-owned pipelines) that you plan to replace.
- A new target system (e.g., a self-managed data warehouse service) with clear architectural advantages.
- Monitoring and alerting infrastructure to track data quality, latency, and resource usage.
- A comparison framework (e.g., row count and checksum tools) to verify equivalence between old and new systems.
- Rollout and rollback mechanisms (e.g., feature flags, versioned deployments) to control migration pace.
- A clear job inventory listing all pipelines to be migrated.
- Cross-functional team support (engineering, operations, data science) for validation and troubleshooting.
Step-by-Step Migration Plan
Step 1: Define a Structured Migration Lifecycle
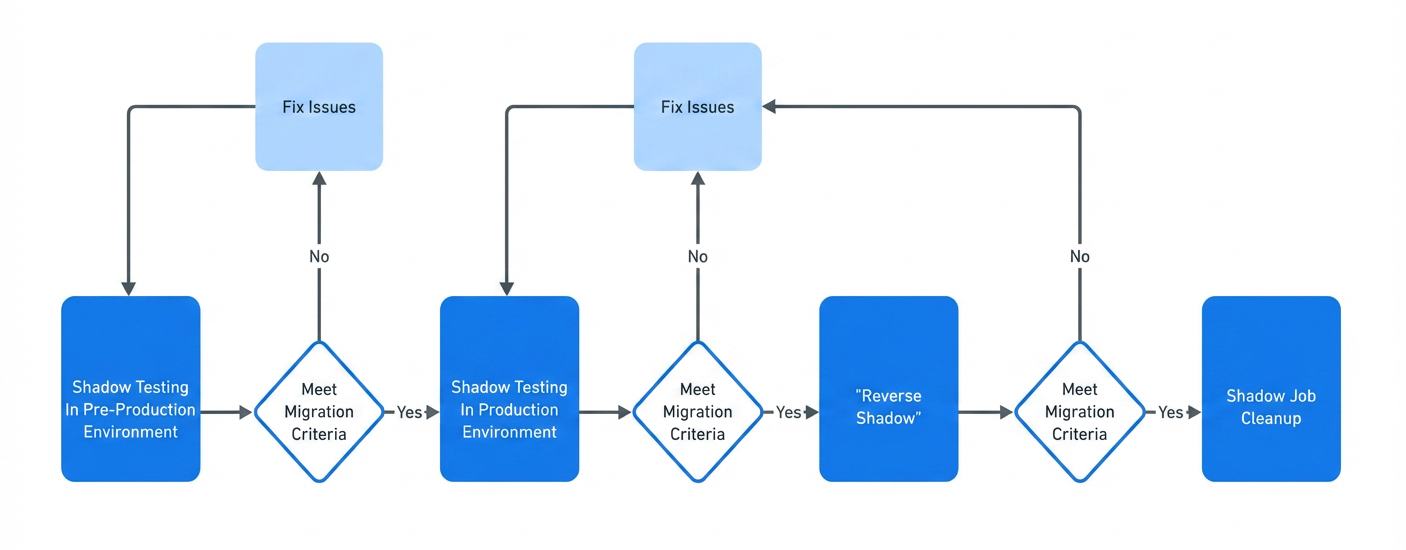
Before any actual migration, establish a formal lifecycle that every job must follow. This ensures consistency and traceability. Our lifecycle included four stages: Validation, Sandbox, Canary, and Full Production. Each stage has specific exit criteria that must be met before moving forward.
- Validation: Run the new system in parallel with the old one for a limited set of data. Compare outputs using automated checks.
- Sandbox: Expand parallel execution to a broader dataset, still under close observation.
- Canary: Route a small percentage of production traffic to the new system while maintaining the old system as a fallback.
- Full Production: Switch 100% of the job to the new system and deprecate the old pipeline.
Document these stages and communicate them to the entire team. This lifecycle became the backbone of our migration.
Step 2: Verify Data Quality with Row Counts and Checksums
Data integrity is non-negotiable. For each job in the migration lifecycle, we compared the output from the legacy and new systems using two metrics:
- Row count: Ensure the number of rows delivered is identical.
- Checksum: Compute a hash (e.g., MD5) over the entire dataset to confirm content equality.
If any discrepancy is found, the job is blocked from progressing to the next stage. This automated check catches subtle changes, such as column ordering or formatting differences. We also added a third check: schema validation to ensure column names and types match exactly.
Step 3: Monitor Landing Latency with No Regression
The new system must deliver data as fast as—or faster than—the legacy system. Landing latency is the time from data creation in the source to availability in the warehouse. For each migrated job, we measured latency over a week-long window and compared it to historical baselines.
- If the new system shows an improvement, the job passes.
- If latency is within a small tolerance (e.g., <5% slower), we investigate further before approving.
- Any significant regression (e.g., >10% slower) triggers a rollback to the legacy system and a root-cause analysis.
We used time-series dashboards to visualize latency trends, making it easy to spot anomalies during the canary stage.
Step 4: Check Resource Utilization for Efficiency
A successful migration should not degrade system performance. We compared CPU, memory, I/O, and network usage between the legacy and new systems for each job. The goal: the new system should use equal or fewer resources. If resource usage spikes, it could mean the new architecture is not optimized for the workload.
- Automate resource usage collection via agents running on both systems.
- Set thresholds (e.g., 20% increase) that automatically flag a job for review.
- Document any exceptions (e.g., if the new system uses more resources but reduces latency significantly).
This step helped us catch inefficiencies early and optimize the new system before full rollout.
Step 5: Implement Robust Rollout and Rollback Controls
To handle issues during migration, we built two key mechanisms:
- Gradual rollout: Use feature flags or configuration to migrate jobs one at a time or in small batches. This limits blast radius.
- One-click rollback: Every stage can be reversed by switching the data flow back to the legacy system. This was critical during canary testing when a latency spike was detected.
We also designated an on-call engineer for each migration wave who had the authority to rollback immediately if any of the three metrics (data quality, latency, resource usage) failed.
Step 6: Track Migration Lifecycle for Thousands of Jobs
With a large number of jobs, manual tracking is impossible. We built a centralized dashboard that showed:
- Current stage of each job in the lifecycle (Validation, Sandbox, Canary, Full Production).
- Status of the three checks (data quality, latency, resource usage) with pass/fail indicators.
- Number of days a job has been stuck at a particular stage.
This dashboard gave us a bird’s-eye view of migration progress and helped prioritize stalled jobs. We also added automated alerts for jobs that didn’t advance past a stage within expected timeframes.
Step 7: Deprecate the Legacy System Fully
Once all jobs have passed through the lifecycle and are running on the new system, the final step is to shut down the legacy infrastructure. This reduces cost and complexity. However, do this only after a burn-in period (e.g., two weeks of stable operation). During that period, keep the legacy system available as a safety net, but direct no real traffic to it. After confirming zero incidents, decommission the hardware and remove the code.
We also recommended archiving logs and configuration snapshots from the legacy system for auditing purposes.
Tips for a Successful Migration
- Start with low-risk jobs: Migrate non-critical pipelines first to build confidence in the process and tooling.
- Automate wherever possible: Manual checks don't scale. Use scripts and monitoring to verify each criterion.
- Communicate frequently: Hold daily syncs with stakeholders to discuss progress, blockers, and unexpected findings.
- Plan for the worst: Always have a rollback plan and test it before the actual migration.
- Measure success metrics beyond the migration: After completion, check if the new system meets long-term goals like scalability and maintainability.
- Document lessons learned: Capture what worked and what didn’t to improve future migrations.
Related Articles
- Redefining the American Dream: A Dialogue on Democracy and Opportunity
- Breaking: Volla Phone Plinius Launches with Rugged Design and Dual OS Freedom
- 5 Key Updates on the REZ Transmission Line Route Change
- The Ultimate Guide to Aerobic Exercise for Knee Osteoarthritis Relief
- Massive Discount on Lego Star Wars UCS Venator: A Must-Have for Collectors
- Selecting the Right No-Code Database: A Practical Guide for Startups
- Understanding Durable Workflows in the Microsoft Agent Framework: Key Questions Answered
- Life After CEO: A Sabbatical of Leadership and Venture